Today is the 8th project of the 12 Christmas crafts challenge. I'm going to show you how to make a rustic Christmas decoration using Mason jars lids.
From December 1st and until Christmas, I will make one video every 2 days.
For this 12 Christmas Crafts Challenge, I will show you how to make original projects and I will even include free SVG files to download.
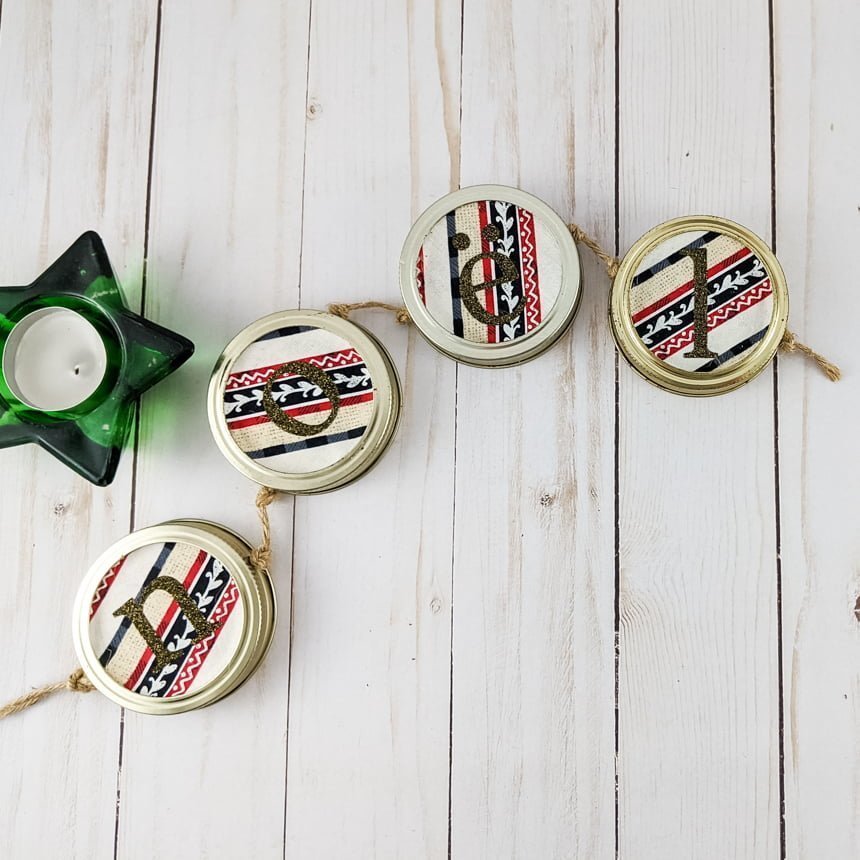
Today, I'm proposing a rustic style mini garland to decorate your home.
DIY Mason jar lids Christmas craft
Mason jars can be used in all kinds of situations (other than canning!). They are both elegant and practical. But what can we do with the lids?
I made this pretty mini garland for you to brighten up your home this holiday season. It can be put in the tree or even hung on the wall.

The really cool thing is that I did it with fabric and Iron-on, but the same thing could be done with cardstock or a lot of other materials. The possibilities are endless!
Go get your lids and let's do this! This post contains some affiliate links for your convenience and at no extra cost to you. Click here to read my full disclosure policy.
What you'll need
Tools
- Cricut Maker (or Cricut Explore Air 2 if you're not using fabric)
- Easy Press (I have the Easy Press 2 9x9, but the mini could be ok too!)
- Easy Press mat (optional)
- Green Cricut mat
- Pink Cricut mat (for fabric, also comes with the Maker)
- Rotative blade for fabric (comes with the Maker)
- Crop-A-Dile
- Brayer
Materials
- Mason jar rings and lids
- Christmas fabric scraps
- Iron-on (the one I use is the Glitter gold-black)
- Jute twine
- Spray adhesive
- E-6000 glue
- Free SVG file available in my resources library by subscribing below.
How to make a Mason jar Christmas craft ornament
Step 1: Cutting the fabric
With the brayer, apply the fabric on the pink mat.

Upload the free SVG template from NeliDesign's library to Cricut Design Space and cut the circle with the rotary blade.
You'll need two fabric circle for each Mason jar lid.
Gently remove the fabric from the mat.

Step 2: Cutting the vinyl
Look at the space the letters are taking in Design Space and cut a piece of vinyl that will fit.

Place it face-down on your mat. In Design Space, don't forget to select "Mirror".

I always prefer to separate the letters before weeding.

Weed the letters.

Step 3: Applying the letters with the Easy Press
Using the Cricut Heat Guide, check the setting of your materials.

Apply the Easy Press according to the time and pressure recommended in the Heat Guide.

Step 4: Glue fabric to lids
Put the lids in an old cardboard box and spray them with adhesive glue.

Apply the fabric to the lids.

Do the same thing for the back of the lids.

Step 5: Assembling the lids
Using the Crop-A-Dile, make two holes on each lids. Make sure you glue the lids to the rigs using E-6000 glue.

Make a knot in the jute twine and start by the last letter.

Make knots on each side of each lid as you go.

Finish by making a loop so you'll be able to hang your Mason lids Christmas craft.

If you have any questions or comments, or even some suggestions for the next craft, don't hesitate to write to me below!
The 12 Christmas Crafts Challenge
Recap
Day 1
Day 2

Day 3
Day 4
Day 5

Day 6

Day 7
Day 8

Day 9

Day 10
Day 11

Day 12
Please, don't forget to Pin it!


