This post will explain the difference between all types of Cricut vinyl, whether it's adhesive vinyl, heat transfer vinyl, printable vinyl or even writable vinyl!
When you start in the Cricut world, you are often overwhelmed by all the possibilities and products.
Vinyl alone can be a complicated category to navigate. In this post, I'll give you a summary of the different types of vinyl, what they are used for and how to differentiate them!
Generally, adhesive vinyl is used with transfer paper to apply to wall and to objects (such as glasses, mugs, etc.), while heat transfer vinyl must be applied with a press. Printable vinyl is used with a printer while writable vinyl is used with pens and markers.
Keep reading to have all the details and do not hesitate to download my No Mistake cheat sheet that will help you to understand how to use all the different materials and above all, prevent any mistakes!
This post contains some affiliate links for your convenience and at no extra cost to you. I get commissions for purchases made through links in this post. Click here to see my full disclosure policy.
Smart or not Smart
Let's start right away with a parenthesis. Cricut has a range of materials called "Smart"
So all types of vinyl mentioned below (except printable vinyl and writable vinyl) are available in "Smart" version and regular version (not "Smart").
What is Smart vinyl? These are products that can be inserted without a mat. Be careful, these only work with the most recent Cricut (at the time of writing this post: the Joy, Joy Xtra, Explore 3, Maker 3 and Venture).
If you have an original Explore Air, Explore Air 2 or Maker, it is possible to use Smart materials but you will have to cut them and put them on a mat.
But honestly, these materials are also more expensive so if they exist in the regular version and you have one of these Cricut, it's not worth buying Smart materials.
How to identify Smart vinyl
Smart vinyl is almost 100% of the time in a box (like the boxes on the right in the photo below) and is clearly marked "Smart".
Also, it comes in different widths so, when buying, it is important to choose the width that suits your Cricut:
- Joy: 5.5 inches wide (13.9 cm)
- Joy Xtra: 9.5 inches wide (24.1 cm)
- Explore 3 and Maker 3: 13 inches wide (33 cm)
- Venture: 13 inches wide (33 cm) or 25 inches wide (63.5 cm)

Adhesive Vinyl
Adhesive vinyl comes in two categories, permanent vinyl and removable vinyl.
Removable adhesive vinyl
Removable vinyl is best suited for projects that you'll want to remove at a certain point. I am thinking, for example, of walls or seasonal decorations.
Permanent adhesive vinyl
Permanent vinyl is made to last and is ideal for exterior surfaces or permanent projects. It is not that it can't be removed, but you'll have much more difficulty. If you apply it to a wall, you risk peeling off the paint.
How to identify adhesive vinyl
What's really confusing is that Cricut has changed its vinyl packaging. Before, there was a blue bar at the top that indicated if it was a permanent or removable vinyl (see roll on the right in the photo)

Cricut has now improved the packaging a lot by using small symbols (see the list of symbols at the end) but also because they are now tubes in which we can insert all our small pieces of leftover vinyl.
How to identify adhesive vinyl leftovers
We always have little pieces of vinyl left after cutting! Fortunately, Cricut identifies the backing of its vinyl by writing "Permanent" or "Removable" (and even "Smart" if it is a Smart).
On the other hand, if you have a small piece of vinyl and there is no writing, you can still identify it. Cricut's permanent vinyl has a green grid while removable vinyl has a gray grid. And it's the same colours for the Smart.
Now, how to differentiate Smart from "Non-Smart"? Well, with experience!! Seriously, the Smart is much thicker (to compensate for the lack of mat) so you'll feel it to the touch.

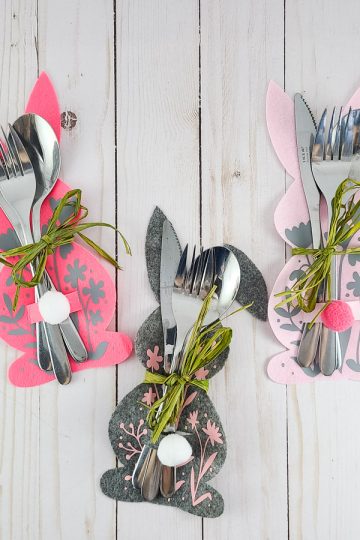
Here are some tutorials that use adhesive vinyl:
Transfer tape
Transfer tape is not vinyl per se, but is used to transfer your adhesive vinyl projects.
Without going into too much detail, let's say that, for example, you wrote a nice quote that you want to apply somewhere. The transfer tape will therefore save you from having to install the project letter by letter!
Be careful, there are several types of transfer tape:
- Regular transfer tape(the one in the photo below) is made for the majority of types of vinyl;
- Regular linerless transfer tape is also made for the majority of types of vinyl but produces less waste since it has no backing (or lining) and is rolled up on itself like adhesive tape;
- The Strong transfer tape is to be used only with textured vinyl like Glitter vinyl, etc. It is far too sticky for regular non-textured vinyls.
How to identify transfer tape
The transfer tape is written "Transfert tape" and has a grid, not on the back, but directly on the transfer tape, which is transparent.

Heat transfer vinyl
Heat transfer vinyl is vinyl that is applied with heat with an iron or a press.
It can have different names:
- The "Iron-on" is the name used by Cricut (trademark);
- I often hear 'flex' from Europeans;
- Here in America, we often say "HTV" which means "Heat Transfer vinyl"
Even if the application with heat immediately makes us think of fabrics, we can also apply the HTV on different porous surfaces such as wood (see the tutorial in the box below), faux leather, cardstock and many others.
How to identify heat transfer vinyl
Again, there are different packaging for heat transfer vinyl.
The old Cricut packaging is identified as "Iron-on" (as on the right in the image below).
The new Cricut packaging has the small symbol of 3 waves (see all the symbols at the bottom of this article) which allows easy identification. The Iron-on is also in a resealable tube that allows us to put in our leftovers.

Do not forget that there is also Iron-On in "Smart" sizes and it is easily identifiable since it is in a box!
How to identify heat transfer vinyl scraps
Heat transfer vinyl has no grid.
One side is glossy and the other is more matte.
The shiny side is the transfer liner which, for Heat transfer vinyl, is always integrated (no need to add transfer tape as for adhesive vinyl)
Now, how to differentiate Smart from "Non-Smart"? Well, with experience!! Seriously, the Smart is much thicker (to compensate for the lack of mat) so you'll feel it to the touch.

Here are some tutorials that use heat transfer vinyl:
Printable vinyl
Printable vinyl is made especially for inkjet printers (it does not work with laser printers).
The idea is to print your project from Design Space to your inkjet printer. Registration marks will also be printed which will allow the Cricut to cut out your prints.
Printable vinyl also comes in several categories and colours
- Adhesive printable vinyl (available in white, transparent, silver or gold)
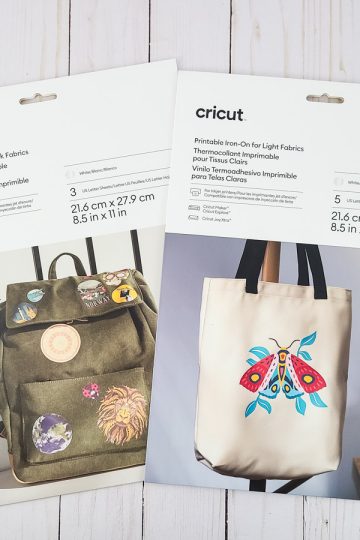
- The printable Iron-On for clear fabrics
- The printable Iron-On for dark fabrics
Adhesive printable vinyl
Be aware that there is also a printable sticker paper. I won't talk to you more about it here since this post is about vinyl and this is paper.
But know that printable vinyl is like a better version of printable paper. It is brighter and creates bright and durable stickers, ideal for notebooks, laptops and organization.

How to identify printable vinyl
This vinyl comes in Letter-size sheets (or A4 for Europe). The back of these sheets has only a green grid written "Cricut" (which is the same for other printable products!). Therefore, I strongly suggest you keep it carefully in its packaging to avoid confusing it with other products!
In addition, there is an old version of this vinyl and a new improved version. How to differentiate the new printable vinyl from the old one? The new version has, on the back, the small "C" of Cricut without the antennas. While the old version has antennas.
Here are some tutorials made with printable vinyl:
Printable heat transfer vinyl
Printable heat-transfer vinyl is also applied with heat. It comes in two categories, one for light fabrics and the other for dark fabrics.

What's the difference between the one for light fabrics and the one for dark fabrics? The one for light fabrics will have some transparency, especially for places in the image that are white. So if you have a pale pink t-shirt, for example, the pink will show through where your design is white.
The one for dark fabrics has a white background that does not allow transparency. So the white will remain white even if your fabric is a dark color.
How to identify printable Iron-on
This Iron-on is available in Letter size sheets (or A4 for Europe). The back of these sheets has only a green grid written "Cricut" and no more information. Therefore, I strongly suggest you keep it carefully in its packaging to avoid confusing it with other products!
Writable vinyl (Smart Label)
Writable vinyl is made to be used with the majority of Cricut pens which means that you can write on it to make beautiful labels (hence the name "Smart Label").
This vinyl is available in permanent or removable (note in the photo below that there is also a "paper" version)
It should also be noted that it is only available in "Smart" format (in different widths depending on the Cricut machine you own). On the other hand, it is not rolled (except for the Explore and Maker widths, i.e. 13 inches (33 cm)). It is usually sold flat like this:

How to identify writable vinyl
Writable vinyl is easier to identify since it says "Smart Label, Writable" on the back. Like adhesive vinyl, the grid is green for permanent vinyl and gray for removable vinyl.
List of symbols
Here are the symbols you will find on the new packaging and their meaning.


Infusible Ink
And what about the Infusible Ink? Well, Infusible Ink is not a vinyl!
Infusible Ink, as the name suggests, is ink that penetrates the fibre (and is not applied over fabric, like vinyl).
It must also be applied to specialized products (e.g. special cups for sublimation or fabrics with a very high polyester content (more than 70% for best results))
So it's a separate category, but I still wanted to tell you a bit about it.
It can be easily recognized by its packaging in a box clearly marked "Infusible Ink".
Its texture is also like a rigid cardstock and therefore easy to differentiate from vinyl. Its back has a grid and says "Infusible Ink" (although I've seen some without grids).


Here are tutorials that use the Infusible Ink: