This tutorial will show you everything you need to know to make beautiful Christmas pillow covers using something that you might not know existed: flocked HTV!
I love pillows for decorating! You can swap the cover according to the season and it doesn't take any space at all to store them!
And this season, what better than flocked HTV to make cozy Christmas pillows?
Don't know what flocked HTV is? You can read all about it in this post.
But let's just say that Flocked HTV is not a regular heat transfer vinyl (or Iron-on). First, it is much thicker and therefore will raise your design giving it dimension.

But the best thing about Flocked HTV is the feel. To the touch, it feels like felt or velvet which makes the design look more professional than the vinyl-looking kind.

These pillows were so easy to make but look soooo professional.
So follow along with me, you'll see how easy it is! This post contains some affiliate links for your convenience and at no extra cost to you. Click here to see my full disclosure policy.
Materials and tools required
- A cutting machine (I have the Cricut Maker, but the Explore Air or even the Joy can do the trick)
- Fine-Point blade (regular blade that comes with the Cricut machines)
- Weeding tools
- Green Cricut Mat (standard grip)
- Easy Press (I have the 12 in x 10 in, but any size can do the trick, see video for more information)
- Easy Press mat (I have the 20 in x 16 in and I would never go back to the smaller ones!)
- Heat resistant tape
- Scissors
- Pillow cover (I'm using Gurli pillows covers from IKEA)
- Inner cushion 20 in x 20 in
I found some Flocked HTV on Amazon here:
- Craftables Flocked HTV
- Firefly Craft Flocked HTV (not available in Canada)
But as a Canadian, my choices were more limited.
That's why I decided to go with a trusted brand: Siser.
Their flocked HTV is called Stripflock and comes in a variety of colours. From what I also learned, it is the only flocked HTV that can be layered and not only as a top layer but also on top of other Stripflock (although, since it's already thick, I'm not sure how it would look...).
If you're in Canada and want to buy the Siser brand too, I strongly recommend shopping at ScriptDesigns.
SVG cut files
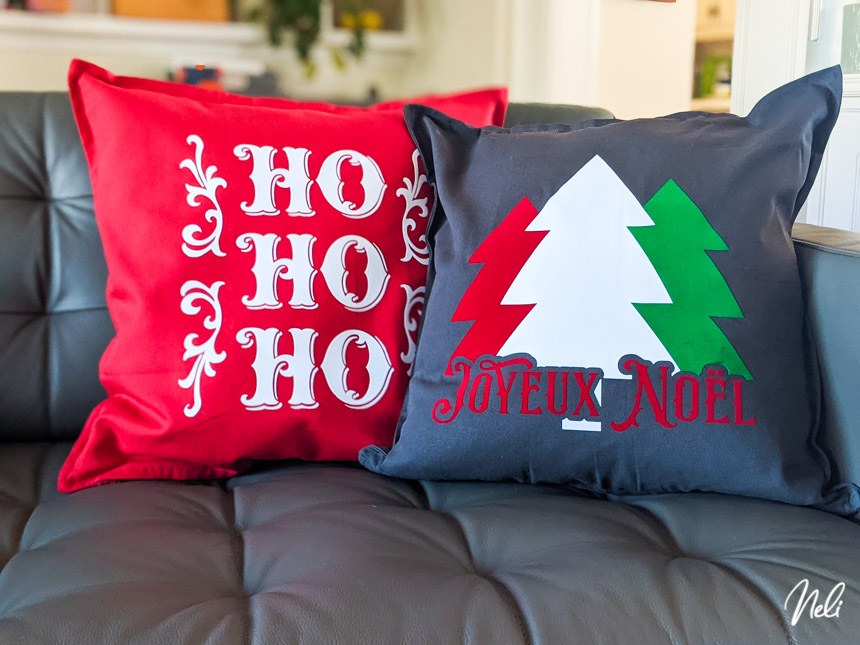
The "Ho! Ho! Ho!" design I'm using comes from this bundle that I bought on Design Bundles made by Caluya Design: BIG!! Vintage Christmas Sign Making SVG Bundle Vol.2
If you prefer to use the "Joyeux Noël" design (that I also have in English), I'll have it free for you in my resources library

How to make custom Christmas pillows using Flocked HTV
If you prefer to follow along in a video (and learn a lot of tips and tricks at the same time) check out this video!
This post is part of the Holiday Showcase!
The Holiday Showcase is 14 creators who have joined together to bring you the most beautiful projects for the holiday season. Check out this post to see all the other beautiful creations

How to cut flocked HTV with your Cricut and apply it with your Easy Press
Step 1: Upload the design into Design Space
In Design Space, click on the upload button and get the SVG cut file where you've previously saved it.

Step 2: Change the size
Making sure the padlock is locked, change the size of the design. I went with the maximum height a Cricut 12 x 12 mat can make: 11.5 inches.

Step 3: Don't forget to Attach
While everything is selected, click on "Attach".

Step 4: Make it!
Click on "Make it". Flocked HTV is like any other HTV and will need to be mirrored. In the "Prepare" window, don't forget to toggle the "Mirror" button.

Step 5: Choose your setting
Did you know that Design Space already comes with a predefined setting especially for flocked HTV? 🙌
Click on "Browse All Materials".

Type "Flocked" in the search bar. You'll find "Flocked Iron-On". Select it and click on "Done".

Tip: When you come to this window, make sure to read everything that's written there!
I know, I know, I'm excited too when I get there and want to make the cut right away! But believe me, you'll be happy for these reminders:
- Make sure Mirror is turned on
- Material is shiny side down
- Load the Fine-Point blade in Clamp B.

Step 6: You're ready to cut
Place the Flocked HTV shiny face down (well, shini-er face down!!) on your green Cricut mat. Insert in your Cricut and push the Go button!

Step 6: Weeding
Remove the HTV you don't need. You can use your weeding tools for the smaller pieces but this design is big enough that you almost don't need them.

Step 7: apply flocked HTV with your Easy Press
You should always check the brand's recommendation to know the heat setting for your Easy Press.
As for Stripflock, Siser recommends 320°F (160°C) with medium pressure for 15 seconds.
Since my Easy Press wasn't big enough, I heated it in two sections.

Step 8: Remove the backing
Now, I won't underline this enough!!! Siser recommends a COLD peal. If your flocked heat transfer vinyl is not sticking, the reason might be that you're not patient enough! 😉
Remove the Easy Press mat from under the pillow and really make sure it's cold to the touch before removing the backing.

Why you might need heat-resistant tape
I added heat-resistant tape to the material list because the flocked HTV makes the backing less sticky.
I was ok with the white, but if you're using other colours (like I did for the other pillow) you might need to use heat-resistant tape to secure your design in place.
If you want more details on how to use flocked HTV, check out this post.
Don't forget to also watch this video to have all the tips and tricks about flocked HTV!
Don't forget to pin this to your favourite board!