Learn how to create a reusable stencil in Design Space and cut it with your Cricut so you can paint your walls.
Do you have projects that start super small and end up taking on incredible proportions?
Well, that's kind of what happened with this project. My goal was simply to do some cleaning in my little entry way.
I started by buying two IKEA shoe storage cabinets. Then I thought it was probably better if I painted the walls before fixing the furniture on them.
And while I'm at it, why not remove the wallpaper that I've wanted to remove for a very long time?!!

I wanted to keep this project very simple and I decided to paint everything in white. But I ended up thinking that a white IKEA storage on a white wall might not have the same shade of white and that it might not look very nice!

So I decided to add some colour, but only on the wall behind the shoe storage. For this, I chose the colour Frozen Toundra from Sico paint (6184-42).
I also had this idea of a stencil that was stuck in my head after falling in love with the wall that my friend Brianna from Bloom in the Black had made. See how amazing it is!

I then told myself that I was probably able to make a reusable stencil with my Cricut and I'm happy to tell you that I succeeded and am very proud of the result!

Although, If you've never used a stencil, I suggest you start with a slightly smaller project. You can see as an example and for inspiration this beautiful wood plank that I made using a stencil!
This post contains some affiliate links for your convenience and at no extra cost to you. I get commissions for purchases made through links in this post. Click here to see my full disclosure policy.
What material to use to make a reusable stencil
Can Cricut stencil vinyl be used as a wall stencil? Unfortunately, the answer is no.
Unless your design is extremely simple, the plastic is too flexible and it's extremely difficult to move it (and even stick it properly for the first time) on a wall. You really need a stiffer material.
So I found this craft plastic that is 0.007" thick. Be careful not to confuse it with the one of the same company, that I used in the post on engraving or in the one on "glass" painting which has a thickness of 0.020".
So this 0.007" plastic is perfect since it is easily cut with the fine point blade (the basic blade that comes with the Cricut Explore Air 2, Maker or even Joy).
Materials and tools required
- A cutting machine (I have the Cricut Maker, but the Explore Air or even the Joy can do the trick)
- Fine point blade (the basic blade that comes with the Cricut)
- Green mat (standard)
- Craft plastic 0.007" thick
- Repositionable spray adhesive(I have this one from Krylon)
- Foam roller and tray
- Foam brush for stencil
- Paper plate or bag
- Paper towel
- Acrylic paint of your choice
Making the pattern in Design Space
For more details, I invite you to see the video you will find at the bottom of this post. But in summary, here's how I made my stencil in Design Space.
Cricut Access images used in the stencil design
To find the images, use the search bar in the Design Space Images and copy the item number by including the #.
- Flower #M14791884 of the "Flower in Spring" image set
- Leaves #M14791A48 of the "Flower in Spring" image set
You can also find the final stencil by following this link.
If you're not a member of Cricut Access yet and want to access all of these designs for free, you can click here to subscribe!
Steps in Design Space
The two elements chosen had small lines inside that I removed using the "Contour". They could not have been preserved anyway since it is the stencil that is kept and not the cut-out shape.

Duplicate both shapes and click on "flip horizontal". The idea is to organize these 4 elements so that they fit into a rectangle of 11.5 inches X 11.5 inches, which is the maximum size of the stencil. This creates the main pattern.

Duplicate the main pattern by aligning it horizontally and vertically. If you do not align it, it creates a diagonal and the result on the wall is not as nice, at least, in my opinion!

Once satisfied with the pattern, use "Slice" to keep only the main pattern as well as pieces of the left, right, top and bottom patterns to serve as registration marks. Watch the video for more details.

To cut the stencil, I used the setting "Foil Acetate" which has a pressure of 292 and will cut twice.
Make sure you do a test beforehand and check if the cut has been successful before removing the mat from the Cricut.
A stencil story
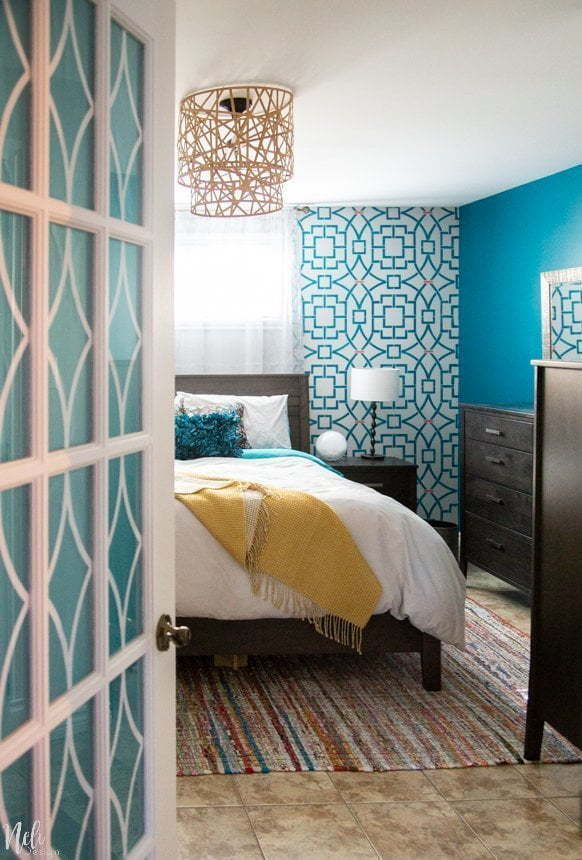
This is not the first time I paint a wall with a stencil. You can see the wall I made in my bedroom the first time. I thought it was the last time because I'm not very patient and I always want everything to be perfect which is very difficult with a stencil.
For more precision, some friends suggested at the time to use a stencil brush so I thought that the small wall of my entryway was the perfect opportunity to try it!
But I did not like it at all!
There really must be something I didn't understand. I have from far preferred my old stencil sponge brush.
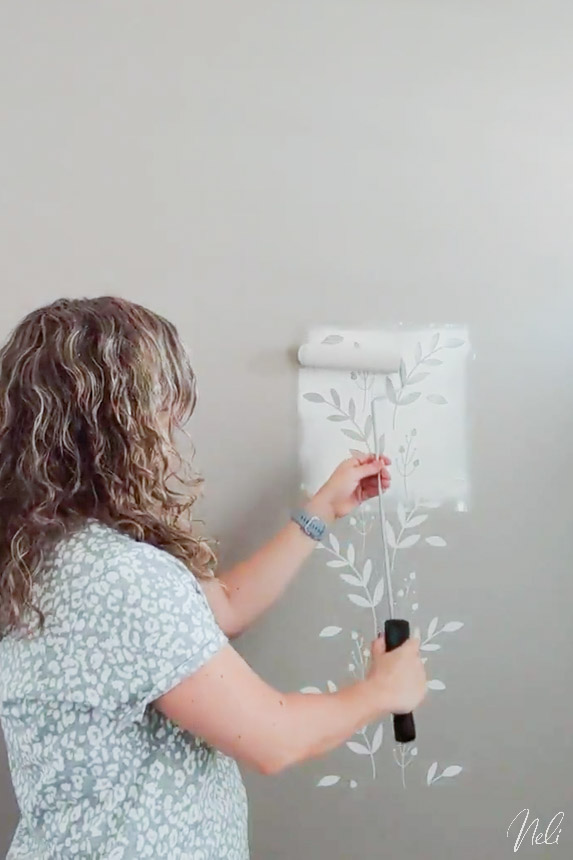
Technique to use
I ended up using a mix of techniques. The foam roller at the beginning, then adding paint with the sponge brush on top and finally the stencil brush by making circular movements to get the paint to go into the very thin stems of the flowers.

For the roller (and the brushes too), it is important to use a dry technique.

You have to remove the paint on paper (I used a paper bag) and then wipe it off a paper towel. So when you apply the paint to the stencil, there is almost no paint that transfers.

It's really not easy, especially at the beginning, but once the paint is well absorbed into the roller, it becomes easier to apply.
Do you really need to use repositionable spray adhesive?
I am sure you are thinking that you do not need repositionable spray adhesive. I know, I said the same thing at first, too. Until I did the test.
To make a stencilled wall, I really think that you must use repositionable spray adhesive! It will avoid a lot of bleeds under the stencil. And if you're as thorough as I am, you'll really appreciate it!
It's really the only way to have a design as crisp as this one.

Make junctions with walls, floor and ceiling
When all that was left was to make the edges with the other walls, floor and ceiling, I simply cut my stencil with a metal ruler and a utility knife. It hurts less than cutting a stencil that you paid forty dollars for!

Ideally, you should put painter's tape before painting to make a nice clean line. But I hate doing this, I prefer to eyeball it!!
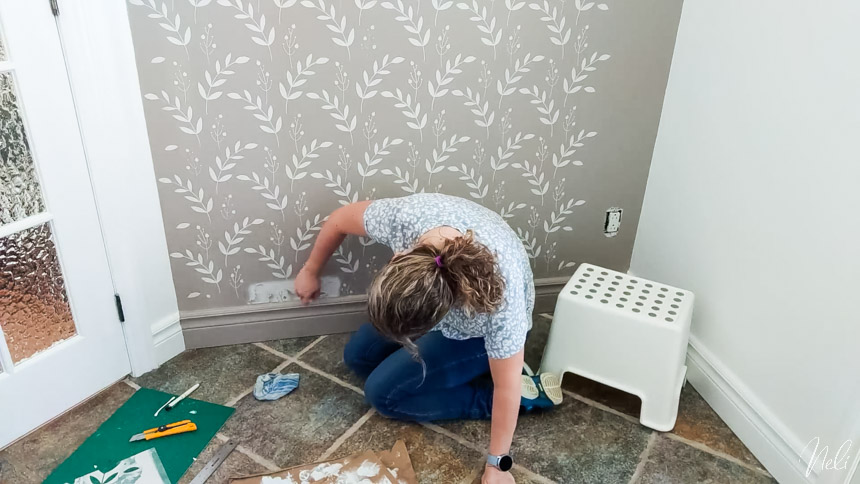
And I'm not that bad at it I think!!! 😉

How to move the stencil
Little tip! How to avoid putting the stencil in paint that is not dry?
Well, just start by placing the stencil in the center of the wall. Then, alternate from bottom to top to avoid putting the stencil on very fresh paint. With the registration marks made in Design Space, it's very easy to align.

The benefits of cutting your stencil with your Cricut
There are several benefits in cutting your stencil yourself instead of buying one already made:
- You can do any design that goes through your mind (well, almost!)
- Your stencil will cost you less (and if you buy the pack of 25 sheets as I did, you'll have plenty left for a lot of other projects!!!)
- You won't be afraid to break your stencil since you can cut it as many times as you want!

If you prefer to buy a stencil
There's a lot of stencils on the market and although I enjoyed making this one myself, the"Cutting Edge" ones are really good. This is the company I used when I made the wall of my bedroom.
So if the idea of making your own stencil is overwhelming you, go check out the beautiful stencils ofCutting Edge Stencils.
Final thoughts
You can see the video for all the details:
I'm really happy and impressed with the result. It really went better than the first time I stencilled a wall! On the other hand, I want to tell you that despite the very small wall it took me the whole day to paint it! I was completely burned out!
Am I going to stencil a wall again? I should say no, but it's so beautiful! (So I guess it's a yes 😂haha!)
If you want to know how I'm going to organize the rest of my little entryway, leave me a comment below!
Don't forget to Pin it!