Cricut has released a new stencil film and I'll tell you what are the differences from the original as well as how to avoid the paint from bleeding underneath.
This post contains some affiliate links for your convenience and at no extra cost to you. Click here to read my full disclosure policy.
Stencil vinyl or stencil film?
Cricut has a new stencil product that they called "Stencil Film" and not "Stencil vinyl" like the original.


The main differences I noted are:
- The new stencil film is available in several lengths and even in the "Smart" version to be used without a mat in the Cricut Joy, Explore 3 and Maker 3.
- The new film has no grid printed on it.
- The texture is completely different, with a much more matte finish (I explain below the impact of this, which is very positive!)
- Cricut also indicates that it is an improved material that is more flexible and gives crisper lines.

You can imagine that I had to try it!
I had already used the original stencil vinyl to create a wood sign in this tutorial.
You will see that, for this wood sign, I had used a layer of Mod Podge (FR) to prevent the paint from bleeding under the stencil.
But since Cricut seemed to say that this stencil was improved, I told myself that I was going to go all the way and that I would NOT put Mod Podge or sealant! 😱
First test with the new Cricut Stencil Film
For the first test, I took a piece of wood that I had on hand. I applied a stain but NO varnish.
Materials used
- Wood plank
- Black water-based stain
- Sponge brush
- Cotton cheese to wipe the stain
- Cricut stencil film
- Transfer tape
- Painter's tape
- White acrylic paint
- Makeup sponge
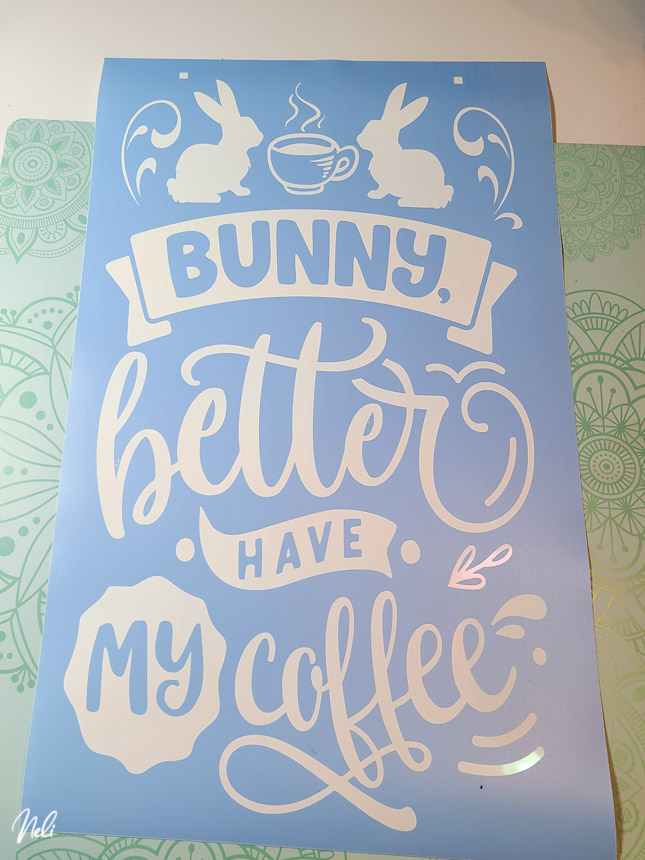
- SVG file "Bunny better have my coffee"
The cutting of the stencil was done wonderfully as well as the weeding. I would even say that the weeding was much easier since the new stencil film is more flexible.

To transfer the stencil to the wood plank, transfer paper must be used.
This is exactly where I had the hardest time in this tutorial.
The original stencil vinyl is so glossy that it stuck to the transfer paper in an incredible way. The new stencil film is more matte and grainy which makes the transfer paper extremely easy to remove! 🙌
Tip: See the small squares I made at the top of my stencil to help me when aligning my design on the wood plank. But, I know myself! So I decided to cover them with painter's tape before painting because if I don't...we all know what's going to happen!!!!

To paint, I used a makeup sponge for the application. I started with a very thin layer and added several layers.

But when I removed the stencil.....
Disappointment 😱

You can easily see the bleeds and infiltrations of paint. We can even see the stain that was removed by the stencil!
Conclusion: always varnish a project before applying a stencil.
But obviously, I'm not the type to give up so I took my brush and made some touch-ups.

I was lucky my stain was dark and my lettering pale otherwise, I wouldn't have been able to make the corrections!


Finally, it's a beautiful result!

Note that if you pay close attention, you will notice that the white now looks a little "dirty". As a matter of fact, I also do not recommend adding a varnish AFTER painting with white paint! 🙈 What a mess!
I decided it gave it a vintage look and I was going to have to live with it! 😂
Second test with the new Cricut Stencil Film
After this failure, I decided to do a second test. After all, my wood plank has two sides!!
So I decided to use an SVG that could do for the rest of the year (so I don't have to store my wood plank at the bottom of a closet!!!)
Materials used
- Wood plank
- Black water-based stain
- Mixwax polycrylic
- Sponge brush
- Cotton cheese to wipe the stain
- Cricut stencil film
- Transfer tape
- Painter's tape
- White acrylic paint
- Makeup sponge
- SVG file "Text me if you run out of toilet paper. I know you are on your phone " (note that this file is also available for free to Cricut Access members)
So this time, I proceeded in the same way except that I applied 3 coats of varnish on top of the stain, sanding lightly between each layer (following the manufacturer's recommendations).
I then applied the stencil film with a transfer paper.
Again, I didn't put an extra coat of varnish to act as a sealant (except in one place, I'll tell you more about it below!).
I'm here to test! So I tested!
So I applied 3 coats of white paint. The first one, very, very thin.


And the result?
Oh no, still some paint bleeds and infiltrations! 😱

But, we do see that the varnish has protected the stain. The back of the stencil is way less black than before.
I told you above that I had sealed the stencil with varnish in one place. Can you guess where in the picture below?

The difference is quite obvious! If I had sealed the whole stencil with a light coat of varnish before applying the paint, I wouldn't have had so many touch-ups to do!!!


Note that the varnish will not crack or flake when removing the stencil. It doesn't have time to dry enough for that.
Well, it was for the good of science as they say! And above all to convince you of the usefulness of a sealant! I'm still very satisfied with my wood sign (and I find it particularly funny!)

Is it still necessary to put on a sealant before applying the paint?
In Cricut's defence, it is mentioned in the product description "For a tighter seal on heavily textured bases, use sealant before applying paint."
So there you have it, it's always better to read the instructions well before starting a project!!
So I always strongly recommend sealing the stencil with a varnish or Mod Podge (as in this tutorial) to avoid bleeds. It is one more step but it's not very long and ends up saving you a lot of time. Also giving you a much more satisfying project.
Other recommendations
- Smart stencil film is much more difficult to transfer to the transfer paper (because of the thickness of its backing). So, if your wood plank is smaller and you have the option to cut on a mat, I recommend taking the regular stencil film, not the Smart one.
- Always apply varnish or protective coat before applying a stencil to avoid lifting the paint or stain when removing the stencil.
- Use small squares as guides to help align your design with your wood sign.
Feel free to pin it on Pinterest!