This tutorial will show you how to make this DIY deer wall art. You'll even get the free printables and cut files to make it. You'll be impressed by how easy it is to make and for a fraction of the price in store!
Here we are already week 3 of this awesome challenge. I entered this challenge really at the last minute, so for me, it hasn't been really the third week! See my first-week post here.

Last week, I was trying to plan my room since I'm away from home for Springbreak. See the entire post here. I talked about hanging some artwork on the right side of the bath.
I saw these nice deer artworks at a store in my town:

But at 125$ (93$ USD) for both of them, it was way out of my budget!!!!!
But good news, I found a way to make them both for waaaaaay cheaper!
Here's what my version looks like:


Amazing isn't it? The thing I like the most is that you can really feel the texture on the canvas. It's not just printed images.
This post contains some affiliate links for your convenience and at no extra cost for you. Click here to read my full disclosure policy.
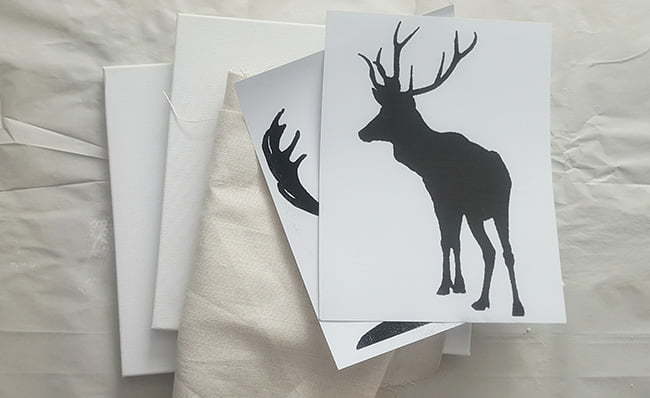
What you'll need to make de DIY deer art
- 2 - 12"x12" blank canvas (or whatever size you like. Take the cheapest canvas you can find)
- My free printables or cut files (available when you sign in at the bottom of this post)
- Wall scrapper
- Mod Podge
- Foam brush
- Burlap-like or linen-like fabric (mine is cotton but looks like linen)
- White and black acrylic paint
- All-purpose Drywall compound - I had a container lying around for a while. It was full of dried lumps and my husband was on his way to throw it away. You don't want lumps on your walls, but your sure do on your art 😉
Step-by-Step Tutorial
So first, you need to print the deer silhouettes and you're in luck, I have these free templates just for you, just need to sign in to have access to them and a lot more freebies!
Cut the linen fabric to the size of the deer.
With Mod Podge, glue the fabric to the canvas.

Then, start applying the drywall compound while holding down the deer silhouette.

Be sure to cover all the surface. Don't mind the lumps and the unevenness of it all. In fact, you should encourage it!

Are you as impatient as I am to take off the deer silhouette? Then go! Let's do it!
That's by far my favourite part! And I'm pretty happy about it! I think I might even use the leftover silhouette for another DIY!

Now you have to pay it dry for at least 24 hours if not more depending on the thickness you applied and the temperature in your house.
In my case, I had a surprise waiting for me:

Yep, you can see exactly where the fabric ended. So, my advice to you: cut the fabric almost the same size as the canvas.
But if you have the same problem that I had, just apply another layer of the drywall compound as shown below.

And then, take a deep breath and wait another 24 hours... ugh
The final step
Take the acrylic paint you already have and mix to find a shade of gray you like. Don't mix too much, the variation in the tint of the gray throughout the canvas makes it look even better.

Are you lazy like me and have trouble washing your paint after you're done? I still had brownish paint from my DIY burlap box on there!!
So go ahead and paint. Don't try to get everything gray. Again, you want to leave texture.

Sometimes, I even went back with a damped cloth to remove some excess paint.

That's about it. If you have any questions, don't hesitate, I'll be happy to answer.
I can't wait to show you what it looks like on the wall of the bathroom. That will have to wait for the reveal! 😉
I already had everything I used, except for the fabric. So, for the $100 Room Challenge, the fabric cost me around 5 $ (CAD). So I still have plenty to go on for the next week.
Have to get to work! Still, plenty to do!
You would like to make this DIY deer art? Just sign up below to get the free printables and cut files.
I also offer support on my Facebook group, join me!
And if you like it, don't forget to Pin it!


Here's the Recap of the $100 Room Challenge
Week 1 | Week 2 | Week 3 | Week 4 | Week 5

UPDATE: This art has now been moved to my bedroom that I also made during another $100 Room Challenge. See how it look in my master bedroom by following this link.
Now, let's see what my blogger friends have been up to for this week's challenge: