[wc_box color="inverse" text_align="center" margin_top="" margin_bottom="" class=""]Dining room lighting is necessary but they usually cost a lot. Transforming a dining room pendant light you already own is a good way to save a lot of money.[/wc_box]
When we moved into our house, there was not only the outside that was yellow, all the walls and ceilings were yellow as well. We repainted the whole house and it was worth it!
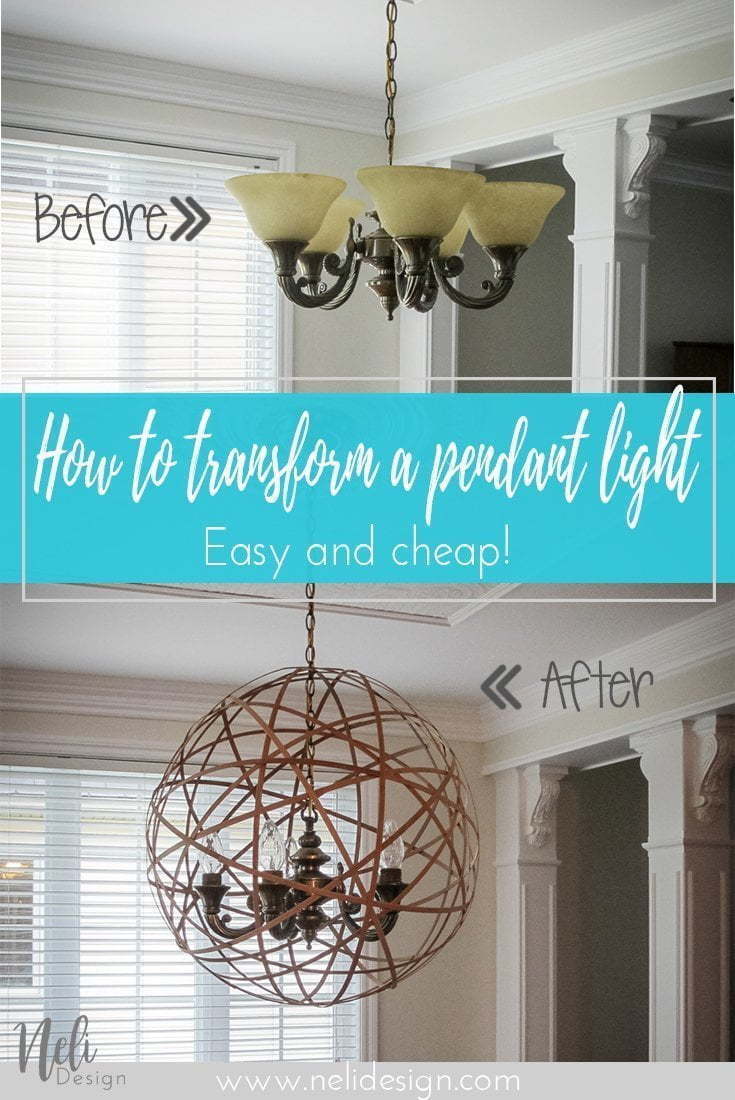
For the dining room, I had a serious distaste for the light above the table. It also looked "yellowed" by time. But it was its original colour!
![]()
I wanted to change it, but a beautiful pendant light cost so much money!
So, here's the easy and cheap solution I found:
![]()
It looks so much better don't you think? Oufff!
This post contains some affiliate links for your convenience and at no extra cost to you. Click here to read my full disclosure policy.
Here's what you need:
[wc_box color="primary" text_align="left" margin_top="" margin_bottom="" class=""]
- Bamboo roll up blinds (mine measured 48 inches. Take the one with flat slats)
- Quick dry wood glue
- Clothespins
- Chandelier type bulb
[/wc_box]
How to do it:
Disassemble the blind and remove the slats.
Assemble two slats together with the wood glue to form a large circle. Use the clothespins to hold the pieces together until the glue dries.
Once you have made at least 3 circles, you can begin to assemble them. Ideally, it should be done directly on the pendant light, like this:
![]()
To suspend the shape temporarily, use a piece of bamboo passed through the chain.

When you are certain of the height at which you want to install the sphere, use one of the bamboos and pass it in the chain instead of the temporary piece. Complete the circle and fix it to the others. Continue adding circles until you are satisfied. Do not forget to glue them to each other by holding them with clothespins until the glue is dry.
** Important: Keep in mind that the openings must remain large enough to insert your hand in order to change the bulbs !!!
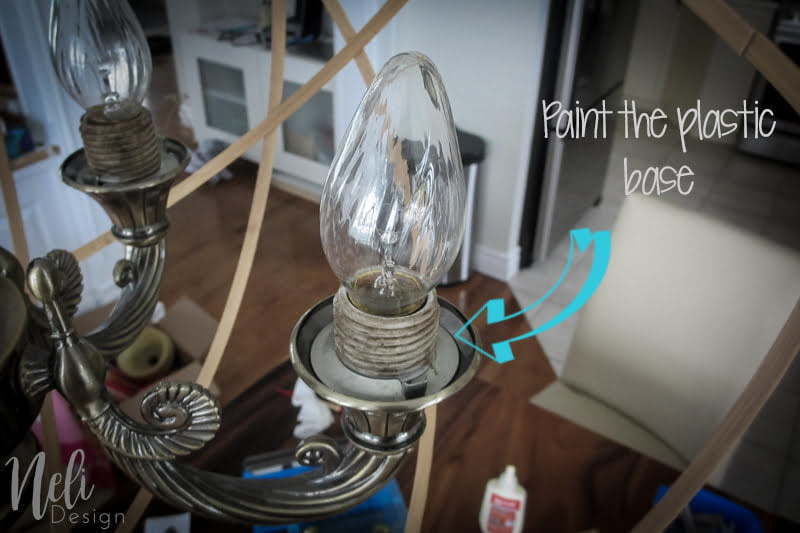
I also painted the plastic base which was too pale for my taste. I simply used acrylic paint. Honestly, it's not perfect, but no one has ever noticed !!!
I really love the final result and it gives nice lighting.
![]()
![]()
![]()
Do you also have a pendant light that you would love to change?
If you like this idea, don't forget to Pin it for later!


[wc_box color="secondary" text_align="center" margin_top="" margin_bottom="" class=""]
Don't miss any new freebies. Subscribe to get access to the library full of resources.
[wc_button type="warning" url="https://nelidesign.com/landing-page/" title="Inscrire" target="blank" url_rel="" icon_left="" icon_right="" position="center" class=""]Subscribe me![/wc_button]
[/wc_box]
Click here to see which Link Party I participate.